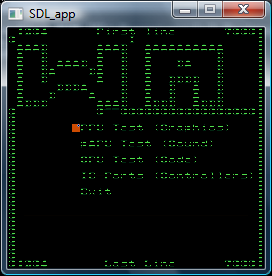
The new PPU

I have completed recoded the PPU, as well as made updates to other logic in preparation for the PPU changes. Although graphically, the games look a lot worse, they are actually a lot better now. Before, the PPU render code was about 250 lines, with lots of bit shifting and logic. Now it's about 12 lines of code, consisting mainly of updating the vram pointer. The reason the graphics are messed up is due mainly to timing issues. I've got a full day tomorrow (well later today technically) working on my new place, so I'm not sure how much I'll get done on Saturday; but next on the list is to get the sprite engine in -- as well as getting CPU and video clocks syncd properly, which should fix the rendering issues; at which point scrolling should also be supported inherently.

Here's what it looks like with the new PPU:

Update

I've been busy doing non-emulator stuff today, but I did get a bit done last night. First off, I re-coded the outer PPU logic to run the scanlines in the exact order specified in the docs I've been reading. Also, I am now using the address register (again, as the docs specify). However, I have two docs saying two different things about how to increment the values, so I'm going to have to figure out the true way to adjust the pointer through trial and error (once again proving that I need to write a doc on how everything works when I'm done). I've also added the logic to properly mirror memory locations for the name tables (depends on the properties cartridge itself). Right now I only coded for vertical and horizontal mirroring. As far as current progress goes, I can tell scrolling somewhat works; but most of the screens are garbage right now. Hopefully I can get my logic working and post some new screens soon.

Teardown Time

OK, it's time for me to finally tear down the PPU logic and build it back up from scratch the correct way. Before, I was calculating values and offsets to tables using C++ variables (seems obvious right?). Now, I am using processor registers just as the real NES would. This will not only speed up my emulation, but will also fix some problems, as games expect certain registers to be modified -- and by me not touching it, it's causing problems.

Wish me luck, this is going to be one of the hardest parts of the whole emulator!

It's time for timing

OK, now that the CPU is working good, I have gotten my hands on a handful of timer roms to check the order of things. I want this emulator to be as close to the real NES as possible, so it is my goal to be able to pass every one of these test roms if at all possible (they all claim to pass on real NES hardware). This means when I get back into writing my PPU, I'm going to have to pay close attention to the clock cycles and how they sync together. I already had to add a delay cycle count for interupts.

Anyway, here's a picture of nestress with a not-broken CPU:
Notet that the numbers above the PPU Test line ARE there when ran in other emulators as well. This screen looks (sans color) exactly as it should; a bit better than what it looked like a few days ago I say.

Finally

I have finally gotten all of the ops working properly. Most of them WERE good, but I had a bug in my BIT opcode which caused some of the evaluations to be weird. Anyway, here's the screenshot:


I still need to go ahead and add in support for the "undocumented" opcodes just so that I can be sure that the processor is working as advertised.

New Screenshots

Alright guys, I have replaced the SBC and ADC functions with inline assembler so that the processor can do the hard work for me (natively too). I've also fixed a few other "bugs". I call it "bugs", but it really deals with buggy documentation or mission information. This is one of the reasons why I'm going to write a full guide for everything when this is done. Even if you follow all of the documentation to the letter, your system will not be correct!

Anyway, here's the good stuff. Keep in mind that my bit2-3 color logic is still not working so the colors will be messed up:


CPU Updates

I spent most of the day doing stuff away from my computer, but I've made a lot of progress in passing these tests. Right now SBC seems to be the big holdup.


Great Find!

I was snooping around the net looking for info before re-hacking my PPU again when I ran across the following site:

On this page was a rom called nestest, which seems to be a lot better at edge case testing my emulator than nestress was. So because I don't have a lot of time tonight, I will work on passing this rom as much as possible. Here's the starting score (OK means it passed, obviously nothing is OK yet):


I will post back once I make some more progress.

Video Data

OK, I've gotten things working a bit better now. nestress now makes more sense, and the Excite Bike logo is completely correct (minutes the 2 bits of color for the palette). But what I'm starting to realize is that my brute force way of rendering the graphics is not going to pass for true emulation. I'm on the right track by rendering per-scanline. BUT, right now I'm doing all address calculations manually. The problem with this is that the NES didn't have the luxery of using magical variables and functions -- it only had it's internal registers to work with. And some games bet on this. So, once again, I'm going to re-think the PPU rendering, and re-tool it to work as close with it's own virtual hardware as possible. This should smooth out any remaining graphical bugs, and have the added benefit of automatically supporting multiple pages and scrolling. Once I am done with all this I will post details on how everything works. The only reason I haven't done so yet is because I'm not 100% sure yet. All in good time of course!

Still alive!

Don't think my lack of posts were due to me not working on the project :) I have been fighting this thing all day. And finally, I present you with...


Thats right, the video is now rendering much better. I have not yet added the code for the other bits for color (hence why the color looks bad), nor have I added sprites back in now. But now that my emulator can run nestress.nes, I can finally use it as a debugging tool to see where my emulator is going wrong.

Of course, there's still lots of work to be done:

But still, this is a lot further than I was a few days ago. Progress is sweet :)

Almost there

OK guys, sorry but I will not have any screenshots for you tonight. I am RIGHT at the point where I can start rendering graphics, but I have to call it a night.

What I have done (besides the DMA thing) is fully hooked up all of the I/O to the PPU, and have implimented the entire outer rendering logic (both in the NESEngine class, and the PPU class). It even updates the VBlank flags and generates NMIs if applicable (depending on the CW1 flag of the PPU). Although I cannot see actual graphics yet, I can see via breakpoints that graphic things ARE happening behind the scenes. Oh, and I have also stubbed the scanline rendering function (which right now does nothing but update the scanline and generate NMIs and VBlanks as needed); this is the function I will be flushing out tomorrow. I'm looking forward to seeing the fruits of my labor!

Direct Memory Access

As I was working on the PPU (picture processing unit), I got back to the point where I needed to support DMA. See, the NES supports a 256-byte DMA transfer between system memory to the PPU's sprite memory (aka SPR-MEM). This transfer takes exactly 2 cycles per byte, and while the DMA is taking place, no other CPU operations can be executed.

I'm not sure if I stated this before, but the processor class does NOT hold the system ram. Instead, the NESEngine class does. This engine class represents what I would consider the "motherboard" of the NES -- it contains the processor, ppu, system memory, and address bus. Of course, the address bus is basically just functional code managed via the read/write functions. These read/write functions are called by the processor via callbacks.

The logic for properly processing CPU cycles is also up to the NESEngine class. And because of this, I modified my CPU cycle code to prioritize DMA when a DMA transfer is available (I have a struct called dma that has the src/dest pointers, as well as the transfer count). When the value of dma.bytesToTransfer is greater than 0, I keep looping through, transferring one byte at a time, decreasing the cycles to render by two each time until either all of the bytes are transferred, or until the cycles to render drops below 2. With this I did not have to modify the CPU code in any way (which makes sense as DMA is a function of the MEMORY BUS, not the CPU).

I'm trying my best to get you readers at least one screenshot before I'm done for the night, but don't hold your breath :)

Processor Source

OK guys, I took a 10 minute break and let the processor run, and there were no crashes so here's the source as it stands thus far.


Obviously it needs to be cleaned up a little, but once the entire emulator is done I will go through and do all of the major prettying up and optimizations. But this will do for now.

Remember this is the 2A03, not a true 6502 processor because it lacks support for decimal numbers (like the real 2A03). Also remember I have no tested this version of the processor with graphics enabled so I can't promise that it's currently bug free.

Feel free to look it over. I'm completely open to any suggestions you may have!

Back to the PPU now :)

** edit **
Yes I notice (and have already fixed) the bug in the adc logic (I needed to mask out the negative bit). I also removed the testVar incrementer. Also note that most ops still reference direct opcodes instead of an op param. This is because at that time, I didn't pass in the operand type. Once I get the chance I will go back and normalize all the functions to use the new logic.

Update

I will be posting an update later tonight with full details on what I have done, along with the full source of my 2A03 emulator class. There was a lot of work that needed to be done in order to add the cycle support so I haven't really had time to do anything interesting.

CPU Updates

I am about half-way done adding the logic needed to support cycles properly. What I have done is added another 0x100 sized array called opCycles, and updated my OPH macro to have a 3rd param that sets this array accordingly. I have noticed that the +1 cycle on page boundaries crossing is only for specific operand types, and is the same accross all ops (great news for me!). So I only need to store the base cycle count. I have also added a function called getCyclesForNextOp() which will pre-read the next instruction and operands, and return.. well.. the number of cycles needed to run it. Then, in my logic that runs the CPU, where I determine the number of cycles that need to be ran, I loop until the cyclesToRun is less than getcyclesForNextOp(). I then store the left over cycles in a variable called.. leftoverCpuCycles. This value gets added back in to the cyclesToRun on the next call for processor execution. Whew...

More processor work

As I write code for the PPU, I suddenly realized something.. My timing logic is based on a CPU clock, not a CPU "execute register" thing. This means I have to go back through all of my opcodes, and add logic to determine the number of clocks each opcode takes. This is made more fun by the fact that a lot of times the clock is increased depending on the address being used.

I'm going to finish what I'm doing on the PPU right now, then go back and add real clock support in the CPU. I'll post with details as I get them.

Ideas for the future

Morning everyone! It's about time for me to finally get down to working on the PPU. Last night and this morning, I was thinking about some ideas for continuing this blog (and my projects) once I finish the emulator. I have already considered moving to another console after this one is done -- but I have an idea to, before considering myself done with the NES, writing a 6502 assembler and maybe some documentation for that as well so that other people can write games for the NES if they want to. What do you guys think about that?

Anyway, getting to work on that PPU now!

Updated main.cpp

OK, here's what main.cpp now looks like, excluding the rendering logic of course:

Have a good night!

Time for timings

OK, I've been reading up on some docs and have come up with a little bit of work I can do tonight before I go to sleep. I will save the PPU for tomorrow as it is a lot of code to delete and redo..

Anyway, the NES clock divider works as follows:
CPU = Video / 12 (NTSC)
CPU = Video / 15 (PAL)

For NTSC, the video is clocked at 21.47727MHz, yielding a CPU frequency of 1.7897725Mhz (which is in line with what the docs are saying). For PAL the video is clocked at 26.601712MHz, yielding a CPU frequency of 1.7734475. So it looks like in my CNESEngine object, I need to have videoClock and cpuDivisor variables in order to allow my main code to be region agnostic. Simple enough.

Back to what I'm going to do now -- Currently I have a timeless tight loop that runs a specific number of cycles before drawing the screen and generating the NMI for VBlank. As I said before, I'm tearing out the PPU logic; so Basically the whole drawing logic is going to be completely removed, and I will also remove the "dumb" processor loop. Instead, I'm going to maintain a timer, and run cycles based off of the time passed.

Now on to the math and logic (the best part!). If you didn't know, a Hertz (Hz) is defined as the number of cycles (the frequency) in a second. With this, I will obviously need a variable to store the value of SDL_GetTicks() at power-on time (GetTicks returns the number of milliseconds since the init of libSDL). I'll call this variable "lastCpuTick". Since a millisecond is 1/1000th of a second, a millisecond is thus 1000hz. When the code reaches the point where it runs the processor (executes opcodes), the code needs to store the current GetTicks value in a temporary variable (lets call it newCpuTick). Then, it needs to compute something like so:

cpuTickDiff = newCpuTick - lastCpuTick

Because someone MAY be running a retardedly fast computer, I cannot assume that cpuTickDiff will be non-zero. After calculating cpuTickDiff, if the result is 0, then I will skip processing CPU cycles this time around, and will leave lastCpuTick alone. Next time around it should be non-zero.

At this point I need to calculate the number of CPU cycles that must be ran. Again, if the value is 0, we will skip running the CPU, and will not update lastCpuTick. Here is the formula I have come up with:
cpuCyclesPerSecond = (videoClock / cpuDivisor)
cpuCyclesToRender = (cpuTickDiff / 1000) * cpuCyclesPerSecond

What I did here was first calculate the number of CPU cycles per second. Obviously the first formula does not change, and thus I will calculate this once when the region is set, and used the stored value. The cpuCyclesPerSecond formula takes the videoClock in Hz (not Mhz), and divides it by the CPU divider to get the CPU clock in Hz. After doing this, it is trivial to calculate the cycles to render. Since cpuCyclesPerSecond is literally just that -- cycles per second -- I simply need to calculate how much of a second (or perhaps even how MANY seconds) has passed, and simply multiply that with the cycles per second. For speed reasons I may simply truncate the decimal points instead of rounding.

If I get a result of at least 1 CPU cycle to render, I will store the value of cpuTickDiff back into lastCpuTick so that we don't loose any milliseconds used in our calculations.

That's all for now :)

Tonight's tasks

OK, my major crashing problem is due to the fact that I was handling the stack the opposite of how I should. Pushing values onto the stack first writes the value to where the SP is located, then decrements the stack pointer. Popping off the stack increments the stack pointer, then reads back the value located at SP. With my stack logic updates, all games are at least running without crashing. No more code paths leading to weird places in memory (yay!). Of course, this also means my processor emulator class is most certainly 100% done now (yay again).

After reading over the docs I have determined that instead of doing per-frame rendering (as I'm doing now), I really need to do scanline rendering to most accurately depict the NES hardware's actual system. So it looks like tonight I will be tearing up my PPU logic, as well as throwing together some calculations in notepad to determine proper timings for things like hblank, vsync, as well as the internal clock speeds for everything.

I think what I will do is use MS offsets to determine when to do what next. For example, if I draw 60 times a second, I will, in the tight program loop, check to see if lastRender is >= 16, and if so, render. From what I'm reading, the NES games are VERY dependant on clock speeds for both rendering, as well as the processor. If I'm emulating them out of sync (which I obviously am right now), it will most likely cause all kinds of problems. For example, some games may want to split the screen half-way down. It would do this by modifying the screen scroll value halfway through the rendering of the screen. If I didn't do scanline rendering, this code would simply not work. We'll see how it all pans out in the near future. Stay tune!

Enough background

The rest of my posts wont be so technical (unless you really really want them to be). Once I am done with everything I plan on writing a very detailed and accurate guide so that anyone following in my footsteps can develop their own emulator without having to go through the pain I'm going through right now. So here's where I'm at right now:


NES Emulator: Day 1 - 4 (cont.)

Starting with a new blank project, I created a standard SDL app that does nothing but create a window, and run in a message loop -- processing the standard messages as needed. I also decided to keep it a console app as well so that I can easily output debugging information with printfs.

I created a class called CNES2A03 to act as the processor emulator. It didn't take long to come up with a design that I believe will work well for my emulator. First, I created a struct to hold the processor's registers (PC, SP, A, X, Y, and P) -- easy enough.

In order to actually "run" the processor, I created a function called "processOpcode()". This function reads in the opcode pointed to it by the PC (program counter) flag. At this point, I needed some sort of way of parsing this opcode and calling specific logic depending on which OP it is. For this, I decided to create two arrays, both of size 0xFF (0xFF is the max number of opcodes the processor can support). The first array holds function pointers (pointers to specific opcode handlers). The second array holds the operand type of the specific opcode. I could have used one array and a struct, but whatever.

Next, I started stubbing out all of the opcodes in the 6502 doc. But pretty quickly, I saw that if I needed to change something, the code would get REALLY messy, so I took a step back and thought about things.

What I eventually came up with is a combination of 3 preprocessor definitions: OPPROTO(x) for prototyping each Opcode handler in the class header, OPDEF(x) for the actual opcode definition in the class implimentation, and last but certianly not least -- OPH(opcode,opname,opparam), which I use in the class constructor to easily fill out my opcodes, opcode handlers, and param types. The end result is like this (in order of prototype declaration, implimentation, and class constructor code -- 2 in the case of this opcode):
OPPROTO(JMP);
OPDEF(JMP)
OPH(0x4C, JMP, AFP_ABSOLUTE)
OPH(0x6C, JMP, AFP_INDIRECT)

Obviously, this made the code much easier to manage. Here are the #define values:
#define OPDEF(x) bool CNES2A03::op ## x(CNES2A03* parent, OPCODE opcode, VAL8 opParam)
#define OPPROTO(x) static bool op ## x(CNES2A03* parent, OPCODE opcode, VAL8 opParam);
#define OPH(opcode,opname,opparam) opFunc[opcode] = &CNES2A03::op ## opname; opFuncParam[opcode] = opparam;

With this, it was simply a matter of going through the documentation, defining, and implimenting each opcode. I also made a function to easily push/pop the stack (stackPush() and stackPop()) properly in-code.

Lastly, I wrote two methods to read and write memory. I wanted to abstract the memory out of the processor (because the processor itself doesn't contain the system memory!). To do this, I simply added two function pointer variables, and made two helper functions to call the function pointers with the necessary parameters. I will later assign these pointers to my CNESEngine which actually contains the memory.

NES Emulator: Day 1 - 4

It's time to start writing an NES emulator! I have decided to use Visual Studio 2008 as my environment, libSDL for graphics/input/sound, and C++ as the programming language. I am very comfortable with all 3 of these, and will help ease development time and difficulty.

I have also found the following documents, and will be using them exclusively (unless later noted) to develop this emulator:
http://nesdev.parodius.com/NESDoc.pdf (General complied NES info)

I have decided for the time being that I will not impliment a plugin interface. However, I will componentize the code into classes that can be accessed easily. This means that input, sound, and video will be done inside classes, and the outer program can get/send data as needed in a generic way.

I will not worry about a pretty GUI for now -- those things are obvious and can be done after all the other work is finished.

First Post

Alright guys, I'm new to blogging so try to give me a break! Anyway, as a life long gamer, and a programmer, I've always been fascinated with emulators; but writing an emulator requires a lot of knowledge of both the console, and of the programming language you are using in order for it to work properly. I believe that my day has finally come and I am at a point where I can actually start developing emulators. I actually started 4 or so days ago so I will make a few more posts today getting everyone up to speed on where I am at currently.

I do want to state right off the bat that I have NEVER looked at the source code of ANY emulator (gaming or otherwise), so my ideas and concepts are my own. If I seem to be doing things similar to other emulators, it is by pure coincidence only -- for there are only so many ways you can achieve certain tasks.

For my first project I plan on emulating the Nintendo Entertainment System (NES), using only publically available documents scattered across the web.